
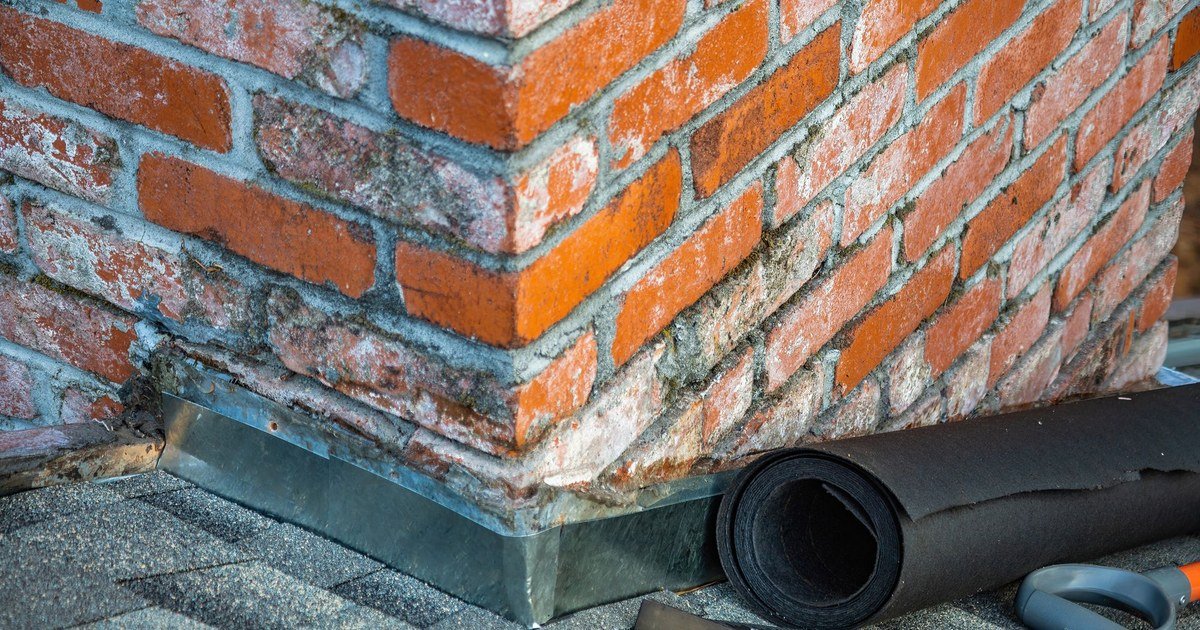
A stain on the ceiling directly below the front face of your chimney is one of the most common roof leaks in American homes, and in most cases the cause is a small piece of metal you have never heard of. Apron flashing is the continuous sheet of metal that seals the downhill face of a chimney, dormer, or skylight where the roof slope runs up and ends against a vertical surface. When it is sized right, lapped right, and covered right, water sheets off the wall and onto the shingles below and the joint stays dry for decades. When it is short, tucked under the shingles instead of over them, or sealed with caulk alone, water finds the corner and the stain appears.
This guide explains what apron flashing is, where it goes, the exact sizes the ARMA Residential Asphalt Roofing Manual and the Owens Corning Roofer's Guide call for, the materials to choose from, the install sequence, the failures to watch for, and what repair and replacement cost in 2026.
What Apron Flashing Is and Where It Goes
Apron flashing is a single continuous piece of sheet metal bent into an L shape. One leg runs up the downhill face of the obstruction and the other leg lies flat over the top shingle course below it. It is also called headwall flashing, front wall flashing, or front flashing, and the three names describe the same geometry: a roof slope that ends against a vertical surface, with water running off the wall and down the roof.
Apron flashing belongs in four places:
- The downhill face of a chimney. This is the classic location and the one that leaks most often. Water running down the roof above the chimney is diverted around the sides by step flashing or a cricket, then rejoins on the downhill side and sheets off the brick face onto the roof. The apron is the piece that catches it.
- The front face of a dormer. Where a dormer rises out of the roof slope, its front wall meets the roof the same way a chimney face does, and it gets the same continuous piece.
- A headwall, where a lower roof dies into a taller wall. A second story wall rising above a lower roof slope is a front wall in the same sense, and the same 5 inch up and 4 inch over detail applies.
- The downhill side of a skylight. Skylights use the maker's own flashing kit, and the kit includes its own downhill piece. Generic apron stock is not a substitute here, and VELUX ties its 10 year installation warranty to correct skylight and flashing installation.
Apron flashing is one of three obstruction flashings that work as a set. The apron covers the downhill face, step flashing covers the sloped sides one piece per shingle course, and a cricket or back flashing covers the uphill side of a wide chimney. One piece alone is not a system. A perfect apron with missing step flashing at the sides still leaks, and the corners where the apron meets the first step flashing piece are the most leak prone points on the whole chimney.
For the wider picture of how flashing, underlayment, and shingles work together as one system, see our guide to roof underlayment, the pillar article for this cluster.
Apron Flashing vs Step Flashing vs Counter Flashing
Homeowners and even some contractors mix these three up, and the mix up matters because each one does a different job at a different part of the chimney.
| Flashing | Where it goes | Shape | Job |
|---|---|---|---|
| Apron flashing | Downhill face of chimney, dormer, or headwall | One continuous L shaped piece across the full width | Catches water sheeting off the vertical face and laps it onto the shingles below |
| Step flashing | Sloped sides of chimney, dormer, or wall | Small L shaped pieces, one per shingle course, woven into the shingles | Channels water down the sides, each piece overlapping the next like shingles |
| Counter flashing | Over the apron and step flashing on masonry | A cap tucked into a saw cut reglet in the brick, lapping down over the base flashing | Covers the top edge of the apron and step flashing so water running down the brick cannot get behind them |
The apron is the only one of the three that is a single piece. Step flashing must be stepped, one piece per course, because the roof slope and the wall meet at an angle and each course needs its own lap. Counter flashing is the cover: on a chimney it is let into a mortar joint and laps down over the apron's wall leg, and it slides over the apron so the chimney and the roof can move differently without breaking the seal. Our guide to counter flashing explains that reglet detail in full.
A common shortcut is to run a single continuous piece of bent metal up the sides of a chimney instead of weaving step flashing course by course. That is apron flashing used in the wrong place, and it lets water channel behind the metal. The sides need steps. The front needs one continuous piece. Getting that distinction right is half of a leak free chimney.
Apron Flashing vs Headwall Flashing: Same Piece, Different Name
Apron flashing and headwall flashing describe the same geometry, and the name usually depends on where the piece sits. "Apron" is the usual name at a chimney, a dormer front, or a skylight. "Headwall" is the usual name where a lower roof dies into a taller wall. ARMA and Owens Corning call both of them "flashing against vertical front walls" and use the same detail for both: at least 5 inches up the wall, at least 4 inches onto the last shingle course, with the last course at least 8 inches wide.
One retail trap is worth knowing. Some big box stores sell a 2.47 inch "roof apron" that is an eave edge flashing for the fascia, not a front wall flashing at all. It is a drip edge by another name, and it does not meet the 5 inch wall leg or the 4 inch roof leg in the front wall detail. If the product on the shelf is under 0.019 inch thick or its legs are shorter than the code minimums, it is not apron flashing for a chimney or a headwall, whatever the label says.
Apron Flashing Sizes: The Numbers That Matter
The dimensions below come from the ARMA Residential Asphalt Roofing Manual and the Owens Corning Roofer's Guide, and the code minimums come from the International Residential Code. Dimensions not set by a published source are marked as such. These are minimums, not targets. Longer legs are harmless as long as the cover shingles still hide the roof leg.
| Application | Wall leg (up) | Roof leg (onto shingles) | Corner or side extension | Metal |
|---|---|---|---|---|
| Front wall with siding (dormer face, wall above a lower roof) | At least 5 in | At least 4 in onto a last course at least 8 in wide | At least 7 in around a sidewall corner | Corrosion resistant metal, 0.019 in minimum |
| Chimney front (masonry) | At least 12 in | At least 4 in | Wraps the corners under the first step flashing | 26 gauge corrosion resistant metal |
| Chimney back (cricket flashing, for comparison) | At least 6 in up the brick | At least 6 in onto the roof | Laps the side step flashing | Corrosion resistant metal |
| Sidewall step flashing (for comparison) | 5 in (code minimum 4 in) | 5 in (code minimum 4 in) | Each piece 10 in long, 2 in wider than exposure | Corrosion resistant metal |
| Skylight downhill piece | Per kit | Per kit | Per kit | Per kit |
The roof leg is the critical dimension. Anything shorter than the 4 inch minimum leaves too little metal over the last course, and water tracking down the wall leg can get under it. The corner wrap matters just as much: the apron must extend far enough around each corner that the first step flashing piece on each side can lap over it, sealing the corner where most chimney front leaks start. A stock 4 by 4 inch piece meets the 4 inch roof leg but not the 5 inch wall leg in the front wall detail, so field cut pieces are the norm on real jobs.
Code sets the floor. IRC R903.2.1 requires flashing at every wall and roof intersection, in corrosion resistant metal at least 0.019 inch thick, which is No. 26 galvanized sheet. IRC R905.2.8.4 sends front wall and chimney flashing to the shingle maker's printed instructions, which is where the ARMA and Owens Corning dimensions come from. IRC R905.2.8.3 covers sidewall base flashing at a minimum of 4 by 4 inches. On the uphill side, IRC R1003.20 requires a cricket on chimneys more than 30 inches wide, and ARMA recommends one at 24 inches or wider.
Apron Flashing Materials Compared
| Material | Spec | Best for | Watch out for |
|---|---|---|---|
| Galvanized steel | 0.019 in (No. 26) minimum; 26 gauge for chimney aprons | Standard residential, inland, asphalt shingle roofs | Can rust if the coating is scratched deeply and left bare; do not mix with aluminum or copper at the corner laps |
| Aluminum | At least 0.019 in; 0.024 in is the IRC minimum for aluminum valley lining | Coastal areas, standard residential | Avoid direct contact with copper or pressure treated wood |
| Painted aluminum (Kynar) | 0.032 in Kynar aluminum sold as apron stock | Visible installations, color matching to shingles | Field cuts expose unpainted edges |
| Copper | 16 or 20 oz apron stock | Premium residential, slate, cedar shake, heritage roofs | Will stain shingles and stucco below; never contact aluminum or steel |
| Lead coated copper | ASTM B101, 16 oz per sq ft | Heritage work, no staining premium installs | Cost and weight |
| Stainless steel | 28 gauge minimum in the IRC valley table | Coastal salt air, premium installs | Harder to bend in the field |
For standard residential work, 26 gauge galvanized steel or aluminum of at least 0.019 inch covers most aprons. Copper makes sense on premium installs where the chimney crown and the full chimney flashing system are getting copper anyway. The rule that matters most is to match the apron metal to the step flashing metal. The lap at the chimney corner puts the two metals against each other in a wet environment, and dissimilar metals corrode each other through galvanic action. The National Roofing Contractors Association publishes installer guidance on flashing details like this, and a good roofer will follow the shingle manufacturer's instructions for the exact product on your roof.
How Apron Flashing Is Installed
The sequence below follows the ARMA and Owens Corning front wall detail. It is written for a homeowner who wants to check a roofer's work, not as a DIY manual. Roof work at a chimney is a job for a roofer, and a bad apron installed by an amateur is worse than no apron at all, because it hides the leak path.
- Prep the chimney and deck. Build the cricket first on any chimney more than 30 inches wide. Carry the underlayment 3 to 4 inches up the wall or chimney face, and add ice and water shield around the chimney base as a second line of defense. On masonry, apply asphaltic masonry primer wherever roof cement will touch the brick.
- Shingle up to the downhill face. Run the shingle courses up to the front of the chimney or wall before any flashing goes on. Adjust the exposure slightly on the previous two courses so the last course is at least 8 inches wide.
- Cut and bend the apron. Cut the metal to the face width plus enough at each end to wrap the corners, at least 7 inches around a sidewall corner. Bend the L so the roof leg extends at least 4 inches onto the last course and the wall leg runs at least 5 inches up a sided wall or at least 12 inches up a chimney face. Match the bend to the roof pitch: 90 degrees plus the pitch angle, so about 117 degrees on a 6/12 roof. A half inch hem on the roof leg edge stiffens it.
- Set it in cement and nail the roof leg. Embed the apron over the last course in asphalt roof cement and nail it to the roof. Do not nail the strip to a sided wall. At a chimney, one or two nails into mortar joints only are allowed to hold the metal until the cement sets. Never nail through the brick face.
- Step flash up the sides, lapping over the apron's corner wraps. The first step flashing piece on each side sits over the apron's wrapped end. Each step piece is 10 inches long and 2 inches wider than the shingle exposure, nailed with 2 nails within 1 inch of its upper edge. Continue up each side one piece per course.
- Cover and counter flash. On a front wall, apply an additional row of shingles in asphalt roof cement over the apron's roof leg, trimmed to the width of the strip, and bring the siding down at least 2 inches over the wall leg without nailing into the flashing. On a chimney, install counter flashing in a reglet cut into a mortar joint so it laps down over the apron's wall leg.
The single most important detail in that sequence is the layering order at step 4 and step 6: the apron goes OVER the last shingle course, never under it. Tucked under the course, it sends water onto the underlayment instead of onto the shingle surface, and the joint leaks from the first heavy rain.
Common Apron Flashing Failures
Most apron failures are installation errors, not material failures, and they repeat in the same handful of ways:
- Roof leg under the 4 inch minimum. A short roof leg cannot cover enough of the last course, and water tracking down the wall leg gets under it. ARMA and Owens Corning both set 4 inches as the floor.
- Apron tucked under the last course instead of over it. In the ARMA front wall detail the strip goes over the last course and at least 4 inches onto it. Tucked under, it sends water onto the underlayment instead of onto the shingle surface.
- Corner wraps too short or missing. An apron that ends flush with the chimney corners leaves the most leak prone corner unsealed, and the step flashing has nothing to lap onto. Caulk in that gap is a temporary fix, not a repair.
- Apron nailed through the wall leg. ARMA says not to nail the strip to the wall. Differential movement between wall and roof breaks the seal at every nail head.
- No counter flashing over the apron wall leg. An exposed wall leg on masonry lets water run down the brick and behind the metal. Counter flashing let into a mortar joint covers it. On siding walls, the siding laps at least 2 inches over it.
- Apron wall leg sealed to the chimney with caulk only. Sealant on its own has no lap to fall back on when it ages, and the code calls for cap flashing of 0.019 inch metal, not a bead of caulk. Counter flashing with sealant in a reglet is the durable detail.
- Retail flashing below code thickness. IRC R903.2.1 sets a 0.019 inch minimum, which is No. 26 galvanized sheet. Check the gauge on the label before buying roof to wall stock.
- Mixed metals at the corner laps. Aluminum apron with galvanized step flashing, or copper against steel, corrodes at the lap. Match the metals.
- No cricket on the uphill side of wide chimneys. Apron flashing on the downhill side is half the chimney detail. Chimneys more than 30 inches wide also need a cricket on the uphill side under IRC R1003.20. Without it, water dams behind the chimney and finds its way around the sides.
- Reused apron on a reroof. Owens Corning lets roofers reuse existing flashing only if it is like new, of code gauge, and not rusted, bent, or cracked. A buckled or rusted apron reused under new shingles is a leak waiting for the next storm.
If your chimney already shows a stain below its front face, a roof leak repair inspection will normally check the apron, the step flashing, and the counter flashing together, because a chimney front leak is rarely one piece alone.
Signs Your Apron Flashing Has Failed
You can check the downhill face of a chimney from the ground with binoculars, and the signs are usually visible before the interior stain appears:
- Staining on the chimney face below the metal, or a dark damp line where the brick meets the roof.
- Visible pinholes or hairline corrosion holes in the metal, common after years of freeze thaw cycles.
- A metal edge that has lifted away from the brick or the shingles, or a corner where the apron ends flush with the chimney instead of wrapping around it.
- Sealant smeared along the top edge of the apron where it meets the brick, especially thick black tar. That is usually a previous repair covering a missing counter flashing detail.
- Peeling paint or soft wood on the fascia and soffit near the chimney, or a ceiling stain directly below the downhill face of the chimney inside the house.
- Shingles below the chimney that look lifted, stained, or darker than the rest of the roof, because water has been running under them.
Any of these signs is worth a professional look, because a chimney front leak rarely stays small. Water that gets under the apron runs onto the underlayment and the deck, then into the attic and the ceiling below, and by the time the stain shows inside, the deck around the chimney is often already soft. For a full residential roofing review, or if the stain is growing after each rain, get the flashing inspected before the next heavy rain season rather than after it.
How Much Does Apron Flashing Cost in 2026
Apron flashing material is cheap. The cost driver is labor and access to the chimney. A stock 4 by 4 inch apron piece lists at $14.66, and the published repair ranges below are for flashing jobs that include the apron.
| Job (2026) | Typical cost | Source |
|---|---|---|
| Chimney flashing repair, chimney component only | $200 to $300 | This Old House chimney repair cost guide |
| Flashing repair around chimneys, skylights, vents, and wall transitions | $300 to $800 | SquareDash, April 2026 |
| Sealant renewal on a chimney apron | $150 to $350 | HomeFixx, July 2026 |
| Apron, cap, and wall cap flashing repair | $200 to $400 | Master Roof, Massachusetts, 2026 |
| Chimney flashing repair or replacement | $400 to $1,600 | Angi chimney flashing cost guide, 2026 |
| Full chimney flashing replacement, counter plus apron | $600 to $1,500 | HomeFixx, July 2026 |
| Roof flashing repair, national average range | $569 to $2,536 | Thumbtack, updated July 2026 |
| New chimney cricket, uphill side | $700 to $1,300 | This Old House chimney repair cost guide |
| New apron during a full reroof | Usually inside the per square shingle price | Ask for it as a line item |
A straightforward reseal or patch sits at the bottom of the range, around $150 to $400. A full chimney reflash, apron plus step plus counter flashing on all four sides, runs $400 to $1,600 for a standard masonry chimney, and more where scaffold is needed or the chimney is tall or mid ridge. During a full reroof the new apron is usually inside the per square shingle price, so ask for it as a line item on the quote rather than assuming it is included. If a quote does not mention chimney flashing at all, the old apron is probably being reused, and that is the detail to question first.
Repair or Replace: When a Patch Is Enough
Not every apron problem needs a full reflash. The decision turns on the condition of the metal and whether the original install was right.
A patch or reseal is enough when the apron is the right size, the roof leg is at least 4 inches, the corners are wrapped, and the only problem is dried sealant at the counter flashing reglet or a small lifted edge. A roofer can re wedge and repoint the joint, reseal the reglet, and re dress the metal without lifting shingles. Expect $150 to $400.
Replace the apron when the roof leg is short, the metal is rusted through or cracked in several places, the apron was tucked under the last course, the corners were never wrapped, or the apron was nailed through the wall leg. None of those can be fixed with sealant, because the failure is in the geometry, not the seal. Replacing the apron means lifting the shingle courses around the chimney front, so it is usually done with the step flashing on the sides at the same time. Expect $400 to $800 for the apron alone and $400 to $1,600 for a full chimney flashing replacement.
Replace the whole chimney flashing system when the counter flashing reglet seal has failed and the step flashing is also lifted or corroded, or when the chimney is wider than 30 inches and has no cricket. At that point patching one face leaves the other three to fail next season, and the labor to open the courses once is most of the cost anyway.
One rule to carry into any quote: ask whether the price covers the apron, the step flashing, the counter flashing, and the cricket if one is needed. A low price often covers only the face you can see from the ground.
What to Ask Your Roofer About Apron Flashing
Before a roof replacement or a chimney flashing repair, these six questions cover the whole detail:
- Is new apron flashing included at the chimney front, and will it be at least 12 inches up the face and 4 inches onto the shingles?
- What gauge and metal are you planning, and does it match the step flashing metal at the corners?
- Will the apron wrap the corners so the first step flashing piece laps over it?
- Will you replace the apron rather than reuse the old piece, and is counter flashing in a mortar reglet included?
- If my chimney is wider than 30 inches, is a cricket included on the uphill side?
- Is the new apron a line item on the quote, or is it inside the per square price?
A roofer who answers these clearly is detailing the chimney properly. A roofer who dismisses the apron as an extra, or who cannot say whether it is in the quote, is a warning sign worth acting on before work starts. If you are comparing shingle systems at the same time, our guide to types of roofing warranties explains why flashing details and installation quality matter as much as the shingle warranty itself, and our shingle roofing page covers the systems the flashing has to work with.
Apron flashing will never be the feature you show off about a new roof. It is a quiet piece of bent metal that does its job for the life of the roof with no attention at all. But it is exactly the kind of detail that separates a chimney that stays dry for decades from one that stains the ceiling below it within a few years. For a few hundred dollars at repair time, it is the cheapest insurance on the whole chimney.
Frequently Asked Questions
What is apron flashing on a roof in simple terms? It is a continuous L shaped piece of sheet metal installed across the downhill face of a chimney, dormer, or skylight where the roof slope ends against a vertical surface. It laps over the top shingle course below it and sheds water off the wall and onto the roof.
What is the difference between apron flashing and step flashing? Apron flashing is one continuous piece on the downhill front side of an obstruction. Step flashing is one piece per shingle course on the sloped sides, each piece overlapping the next. The first step piece on each side laps over the apron's corner wrap. One alone is not enough.
What is the difference between apron flashing and headwall flashing? They are the same geometry with different names. Apron is the usual name at a chimney, dormer front, or skylight. Headwall is the usual name where a lower roof dies into a taller wall. ARMA and Owens Corning use the same 5 inch up and 4 inch over detail for both.
What size apron flashing should I use? On a front wall with siding, at least 5 inches up the wall and 4 inches onto a last shingle course at least 8 inches wide, wrapping at least 7 inches around a sidewall corner. On a chimney front, at least 12 inches up the face and 4 inches over the shingles in 26 gauge metal. Skylights use the maker's flashing kit dimensions.
Do I need apron flashing on a skylight? Yes, but use the skylight maker's flashing kit rather than generic apron stock. The kit includes its own downhill piece, and VELUX ties its 10 year installation warranty to correct skylight and flashing installation.
What material should apron flashing be? Corrosion resistant metal at least 0.019 inch thick under IRC R903.2.1, which is No. 26 galvanized sheet. Owens Corning specifies 26 gauge at chimneys. Aluminum, 24 gauge galvanized or Galvalume, 16 or 20 oz copper, and 0.032 inch Kynar aluminum are all sold as apron stock. Match the step flashing metal at the corners to avoid galvanic corrosion.
How long does apron flashing last? No code or shingle maker publishes a service life for apron flashing. Durability tracks the metal, copper and stainless outlast 26 gauge galvanized, the counter flashing over the wall leg, and whether the corners were lapped rather than caulked. Owens Corning lets roofers reuse existing flashing only if it is like new, of code gauge, and not rusted, bent, or cracked.
How much does it cost to repair or replace apron flashing? A reseal or patch runs $150 to $400. Apron replacement runs $400 to $800. A full chimney flashing replacement, apron plus step plus counter flashing, runs $400 to $1,600 for a standard masonry chimney, and the national average range for roof flashing repair is $569 to $2,536. Access and scaffold move the number most.
Planning a reroof? Compare shingle roofing options and read our guide to counter flashing before you choose a system, so the chimney details match the roof you are actually installing.